
- What are WooCommerce Product Categories?
- How to Create and Edit Product Categories
- After you’ve installed the WooCommerce plugin, you’ll see a tab on the left side of your WordPress dashboard. Go to Dashboard → WooCommerce → Products.
- Then, hit ‘Products,’ and you’ll see a list of categories, attributes, and tags. Just like this one below:
- Click on ‘Categories.’ Upon clicking, you’ll see a category page where you can add new categories and edit the already existing ones.
- How to Add Subcategories
- How to quickly edit your Product Categories
- What are WooCommerce Product Tags?
- Do Product Tags Boost SEO?
- What about Product Attributes?
- How to add Product Attributes using WooCommerce
- How to display Product Attributes in your online store
- Bottom Line
In the previous series of Woocommerce articles, we’ve covered subjects such as “how to create an online product page,” everything from Woocommerce shortcodes to shipping, payment gateways, and all that fun stuff.
Now, we’re here to talk to you about WooCommerce product categories, product attributes, and tags, the difference between them, how you can add them to your products, and their role in your WooCommerce store.
So without further ado, let’s jump right into it!
What are WooCommerce Product Categories?
First, let’s narrow it down a bit. What are product categories?
Close your eyes and imagine that you’re shopping in a traditional brick-and-mortar store for a second. What do you value more: a store with clear signage, properly labeled items, and a short line at the register… or a shop where you can easily get lost, feel like you’re wandering through a maze, and spend countless hours without actually buying anything?
A product category gathers all the products or services belonging to the same classification, i.e., something in common. Typically, product categories are created by the firm or company that supplies these products to help customers find what they are looking for.
In general, categories function as filters, bringing together all relevant posts in one location. It is also a component of categories in WooCommerce, but categories are used to group all related products for your customers’ comfort.
Let’s say you’re looking for a pair of jeans in an online store for jeans only, but it all feels cluttered, making it impossible to find what you need. That’s precisely why you need to have product categories on your website.
Not all jeans are the same. You might go for the “slim-fit” category, the “cigarette” or “skinny” one. Let’s say you are browsing an online clothing store. You might encounter categories such as trousers, T-shirts, boots, etc. You could have subcategories such as short trousers, jeans, etc. The idea is to make online shopping an effortless experience.
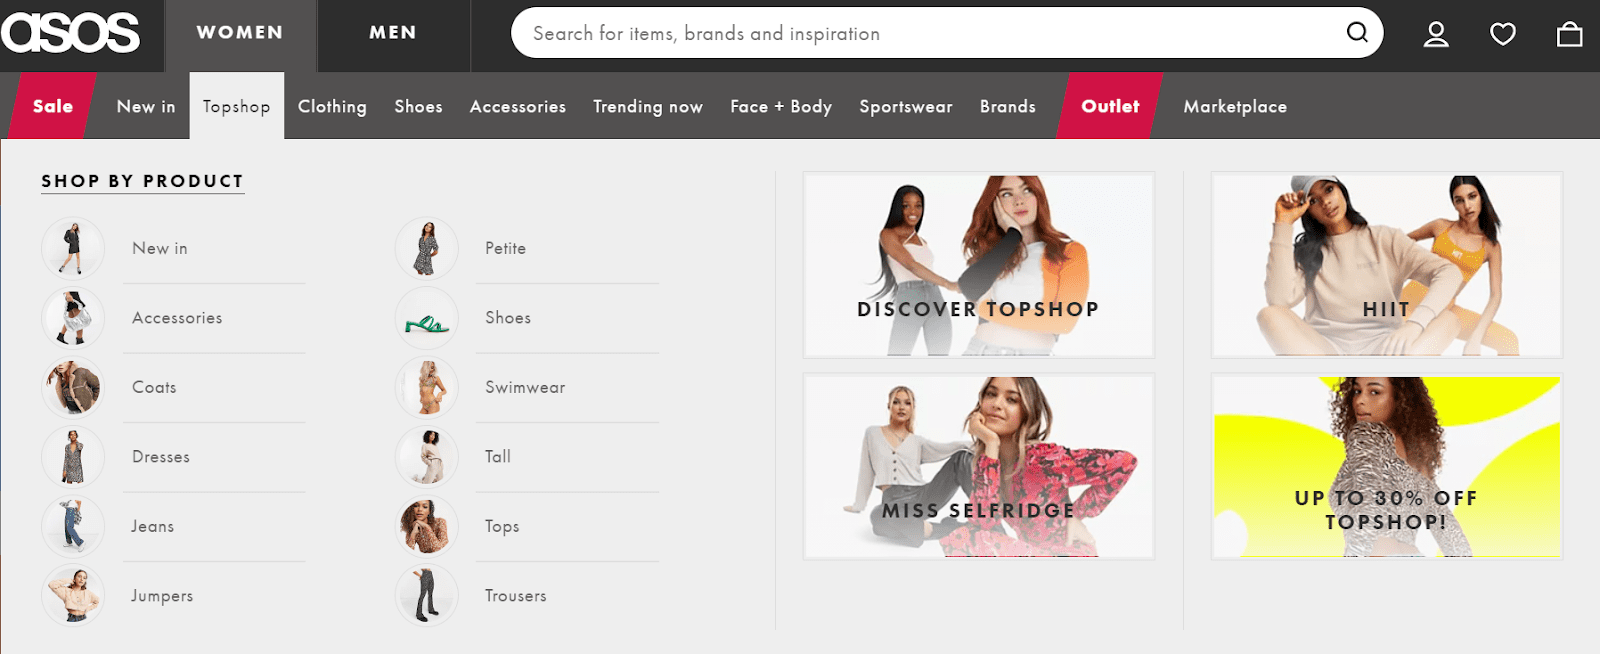
Here’s a more detailed example:
As you probably already know, this retail company sells many clothing and accessory items, so their categories must be very well established. We can see that from the screenshot attached.
So let’s see how exactly you can add and edit product categories according to your preferences using WooCommerce.
Assuming you’ve already installed the WooCommerce plugin if not, head over to your WordPress Dashboard → Plugins → Add New → WooCommerce, and you’re all set.
We’ve also written an article about adding products and setting up a shopping cart using WordPress, so please check that out beforehand.
How to Create and Edit Product Categories
A little disclaimer: WooCommerce product categories and tags function similarly to regular ones when publishing blog articles in WordPress. They can be crafted, edited, and assigned at any time and can be done either when you first create a category or when you come back and edit it later.
Remember that adding appropriate tags and categories to a product can significantly impact sales. As a result, follow these simple steps to ensure that everything is in order.
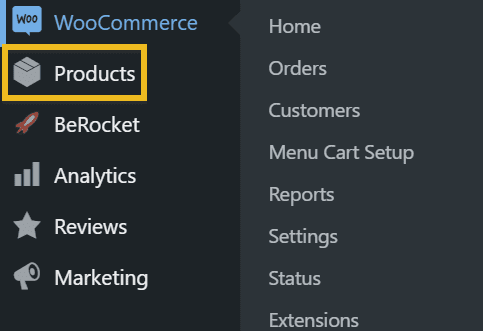
After you’ve installed the WooCommerce plugin, you’ll see a tab on the left side of your WordPress dashboard. Go to Dashboard → WooCommerce → Products.
Then, hit ‘Products,’ and you’ll see a list of categories, attributes, and tags. Just like this one below:
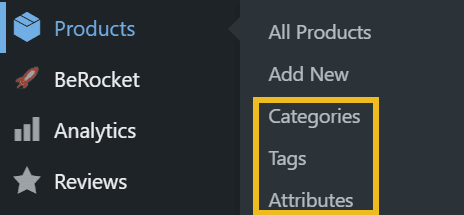
Click on ‘Categories.’ Upon clicking, you’ll see a category page where you can add new categories and edit the already existing ones.
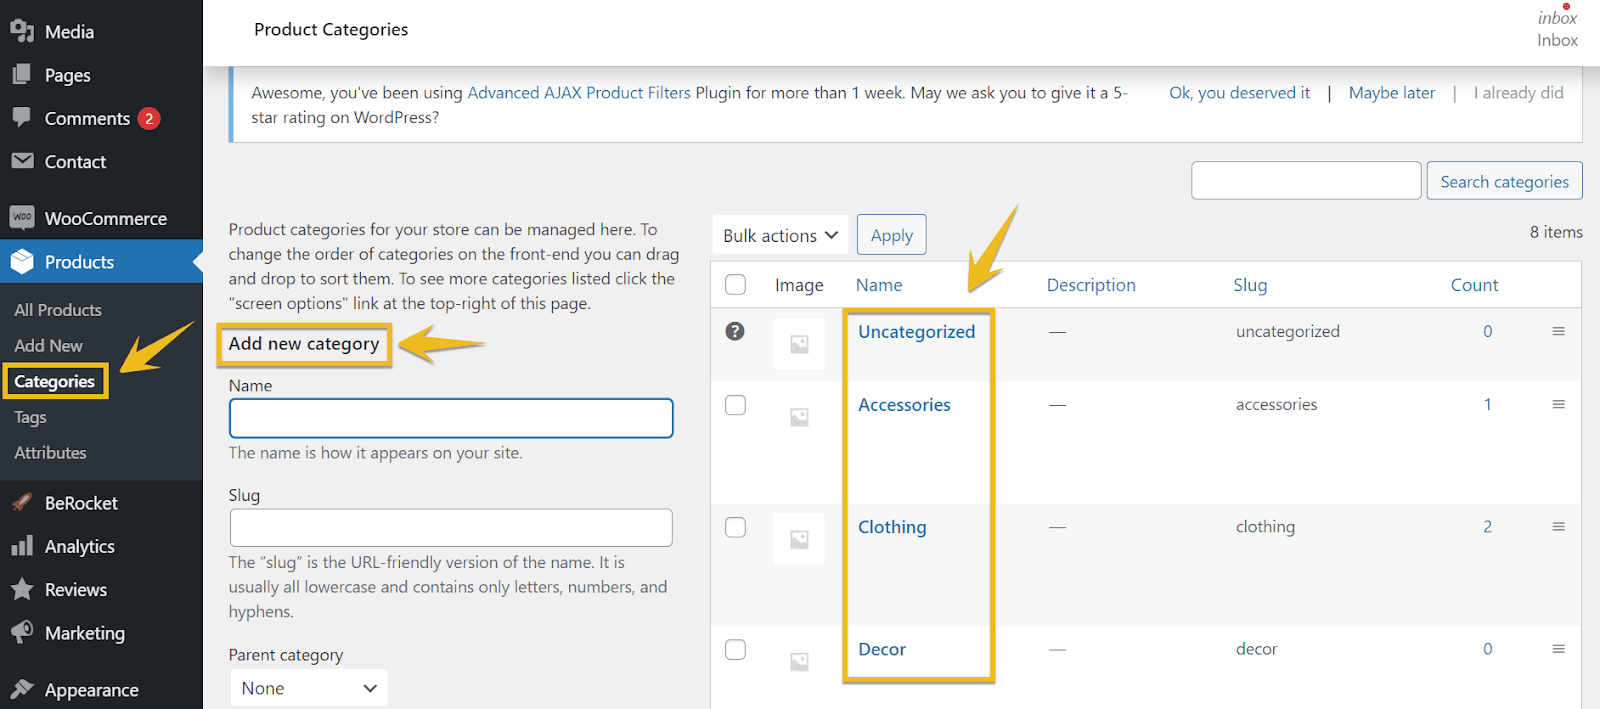
You’ll notice a category called “Uncategorized.” That one is there by default and cannot be removed. You can, however, rename it and cast it to one of the categories you plan to use.
Assume you’re starting a clothing shop. Hover over the ‘Clothing’ category and select ‘Edit.
This is what you’ll see: 👇
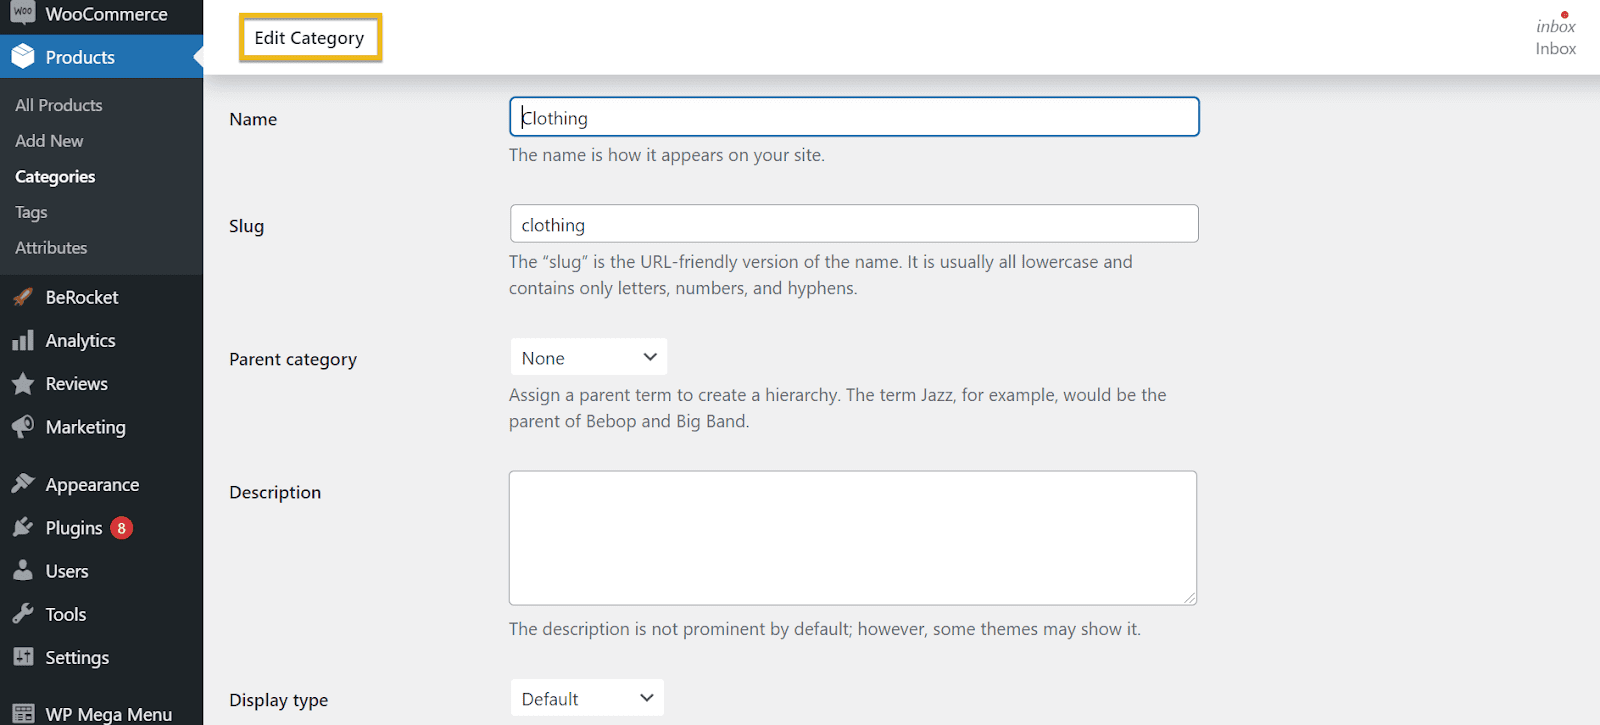
From here, you’ll be able to set the name you wish, slug, the main category (parent category), description, and much more. Don’t forget to hit ‘Update’ once you’re done.
How to Add Subcategories
Adding subcategories to your menu can be a real game-changer. For example, you have a great collection of bags that you want to sell, but they all have different styles; some are elegant, and some are on the sportier side.
This is where subcategories come in handy. Check out the example below to see what I am talking about.
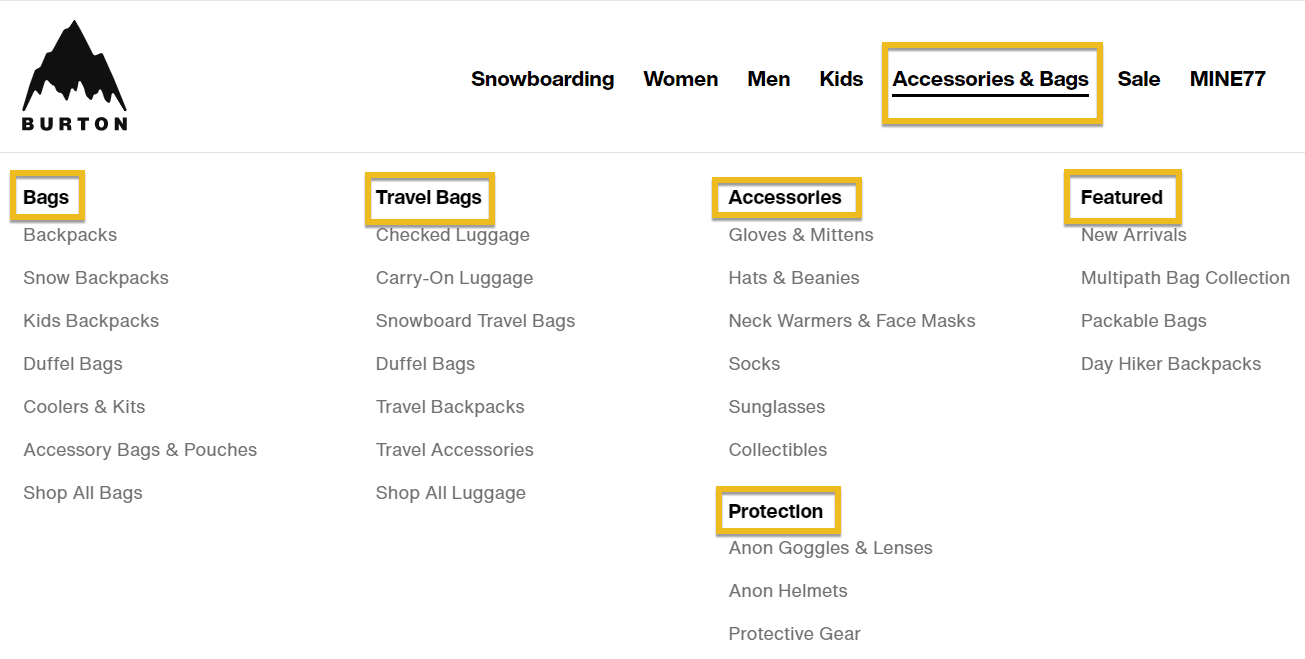
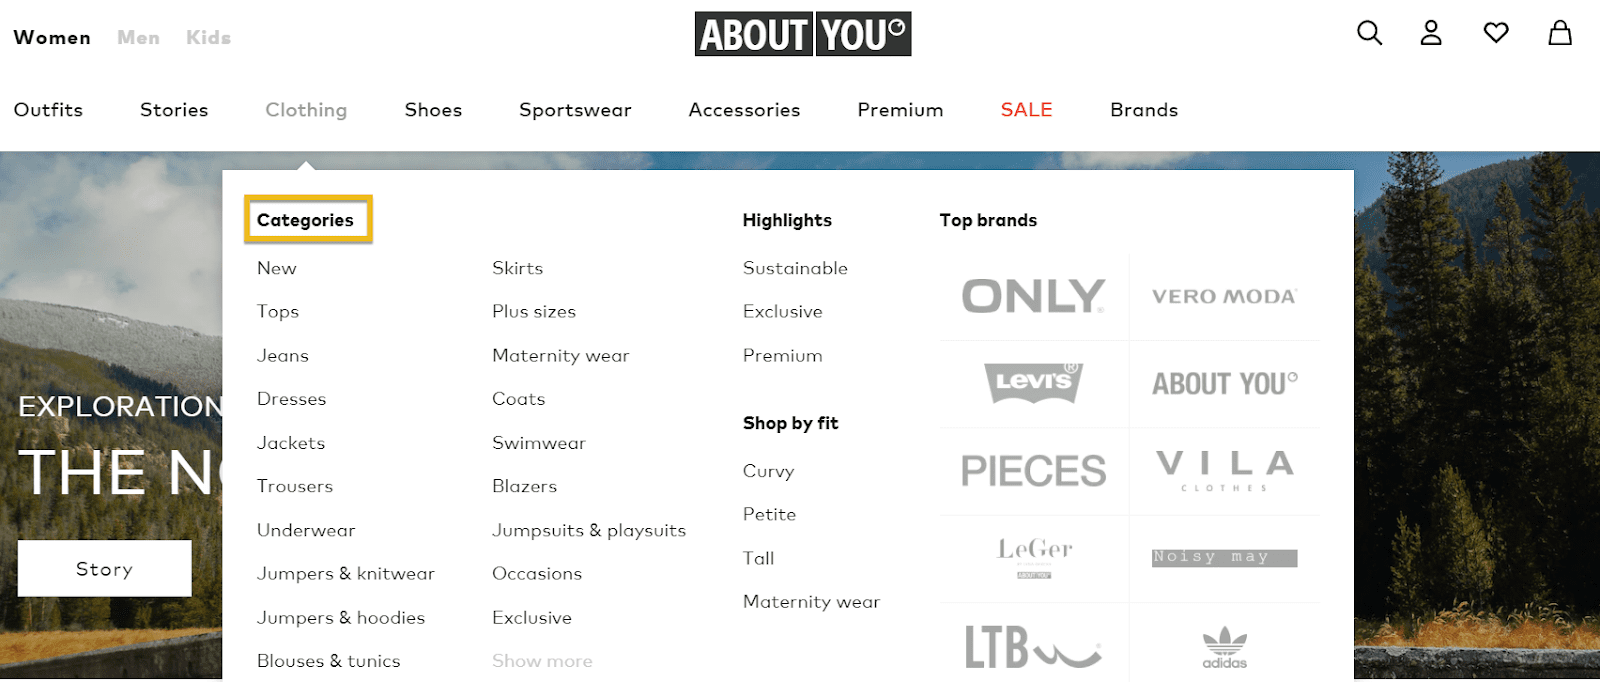
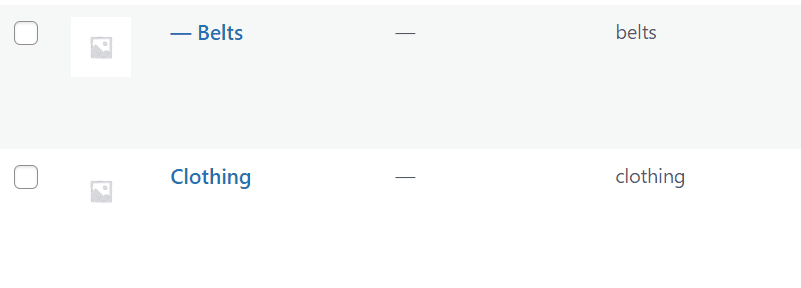
As you can see from here, the main category falls under ‘Accessories and Bags,’ and the subcategories within are highlighted.
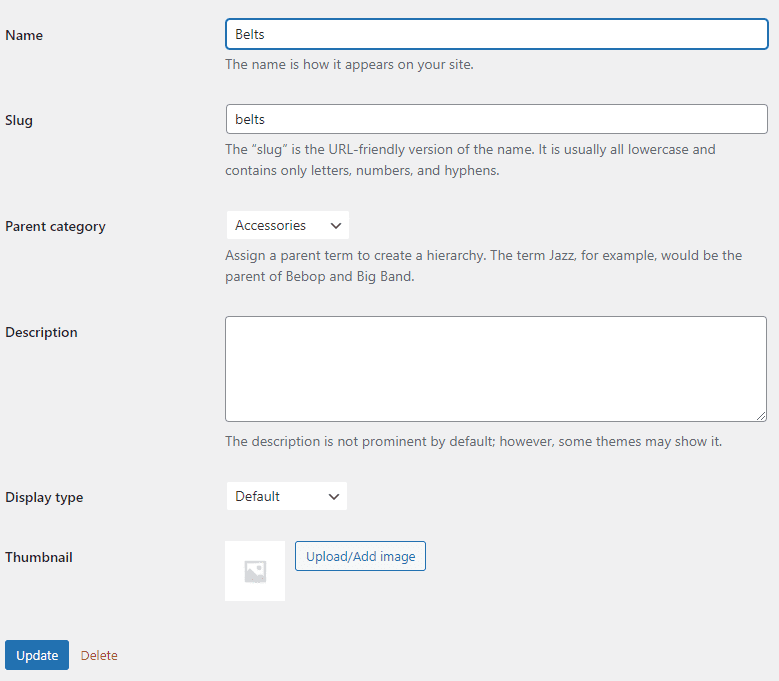
You must first select a category to serve as the parent category to add subcategories. For example, you can add a “belts” subcategory to the “accessories” parent category if you store clothing items. Just like this: 👇
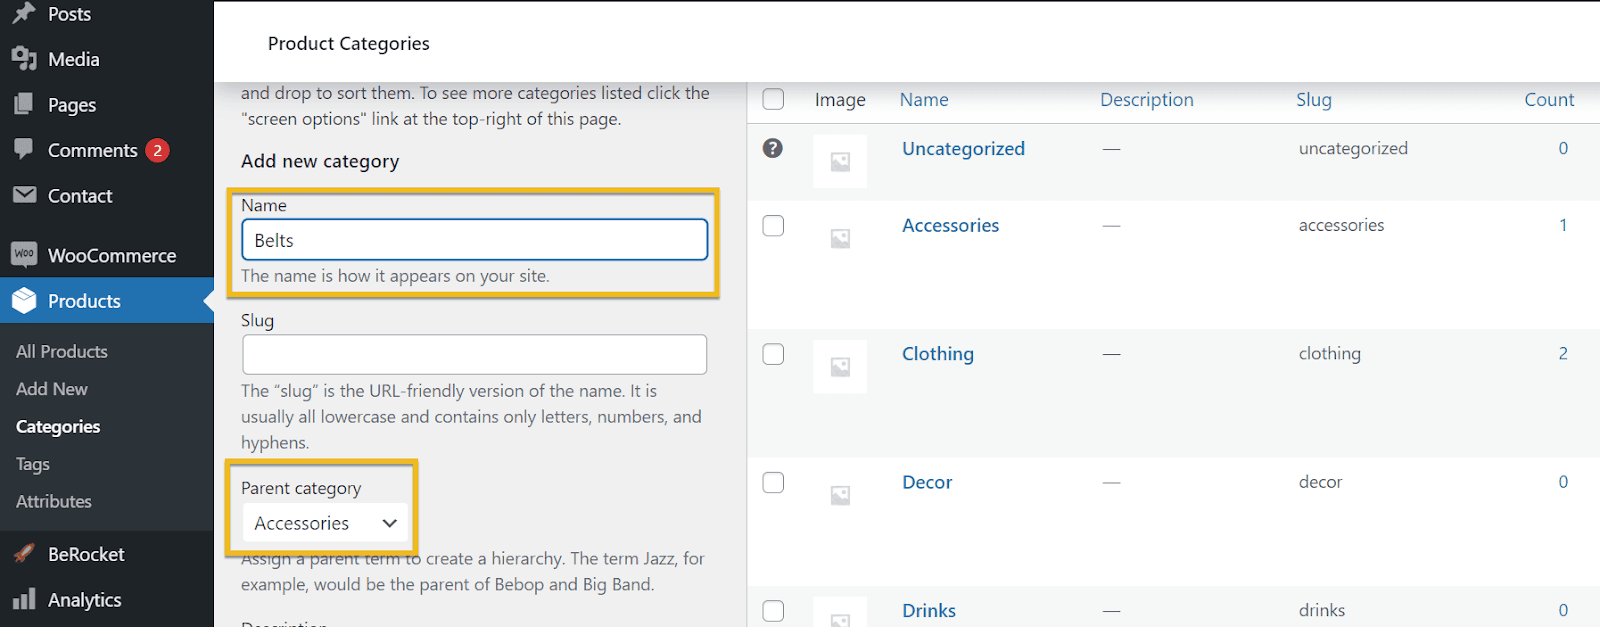
After you’ve finished naming your subcategories, hit ‘Add a new category and you’re all set. All your child categories will be marked with a dash like this:
How to quickly edit your Product Categories
The great thing about product categories is that you can easily edit them from your WordPress Dashboard without digging in the back and scraping the code. Let’s see how!
If you head over to Products → Categories, this is what you’ll see:
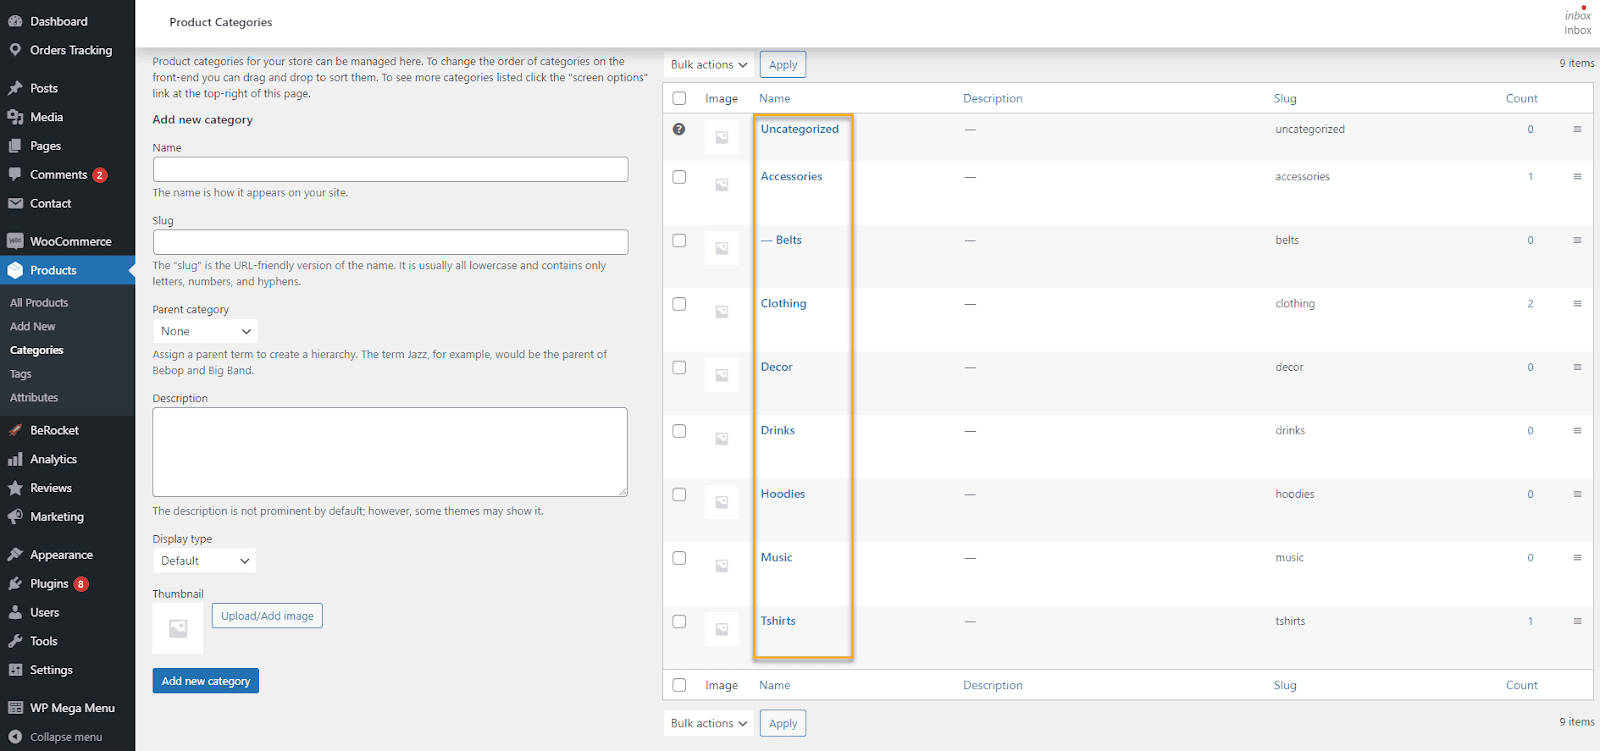
You can choose to edit these categories according to your preferences quickly. Upon clicking on a category, a small editing tab will appear where you can make adjustments to your category.
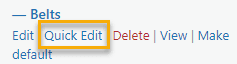
What the ‘Quick Edit’ button does is that it allows you to change the category’s name and slug.

However, if you want to make significant changes to your category, you’ll need to go to ‘Edit.’
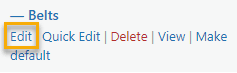
This option will allow you to change the parent category, meaning whether the product belongs to the ‘clothing’ category or ‘accessories,’ ‘hoodies,’ or whatever category you have. Moreover, you’ll be able to add a relevant description to your category and even upload a featured image. See the screenshot below for a better insight.
Don’t forget to click the ‘Update’ button to save all your changes.
Once you’re finished creating and editing your categories, it’s time to add product tags, leading to our next chapter.
What are WooCommerce Product Tags?
Tracking products throughout the eCommerce supply chain is critical to running your eCommerce business smoothly.
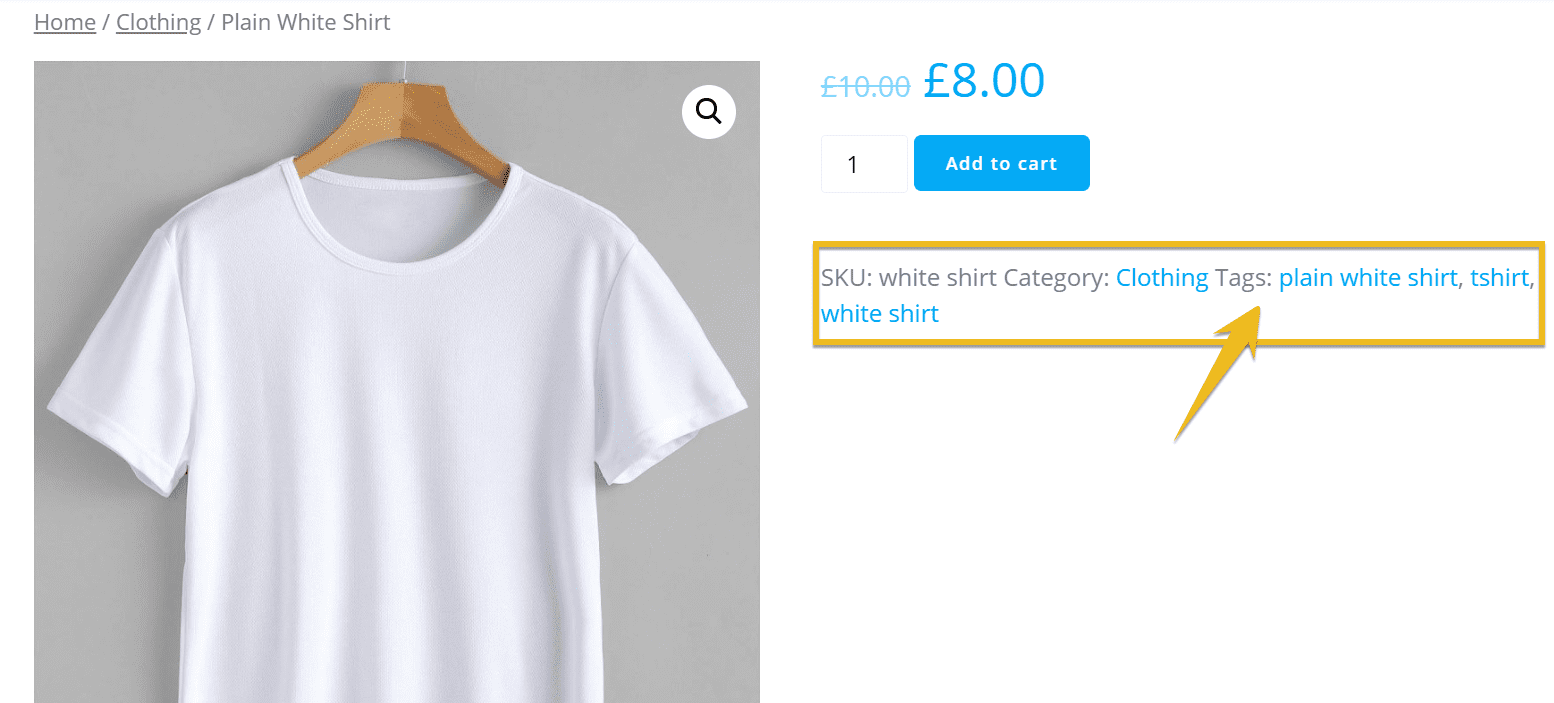
Product tags are one way to accomplish this. They may include the product’s name, a barcode for tracking, product information, and, in some cases, the SKU number. Although product tags are primarily used for products sold in physical retail stores, they can also be helpful for online stores, and we’ll see how.
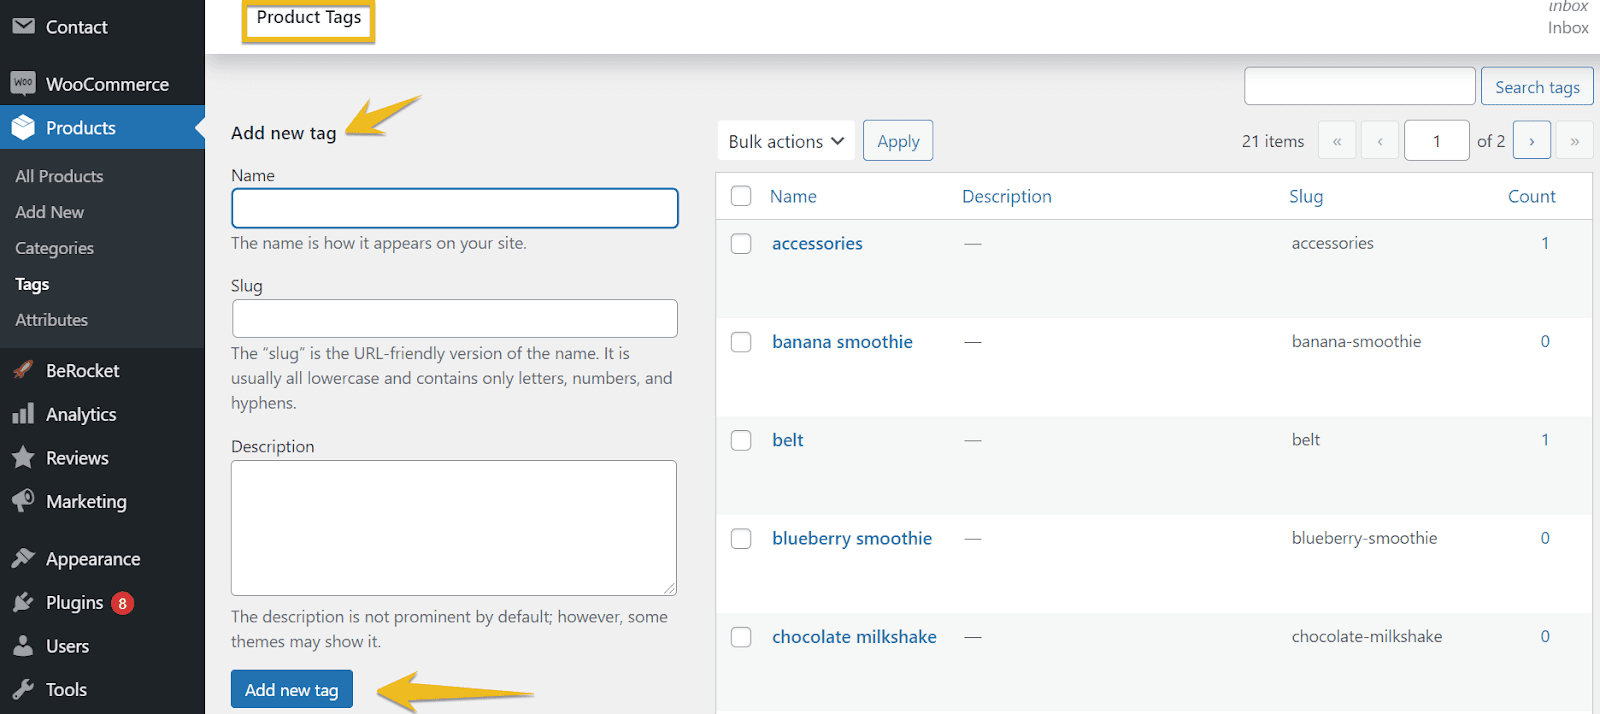
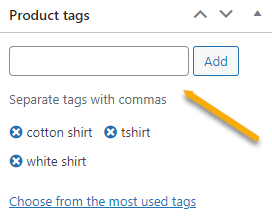
To add product tags, navigate to ‘Products’ and then ‘Tags.’ You’ll be greeted with a screen similar to the one you use to add tags to your blog posts.
Once you open the ‘Tag’ section, this window will pop up from where you can create and edit your product tags. Don’t forget to hit ‘Add a new tag’ at the bottom of the page.
This is how your product tags will look like in your WordPress Dashboard:

Also, if you want to add more tags to an existing product, all you have to do is hit the ‘Edit button, which will appear upon clicking on the product, and you’ll be able to add as many tags as you wish.
One of the most significant advantages of a product tag is its ability to rapidly transmit information, whether a store employee picks a product or a customer is looking for product information.
Here’s what your product tag should include:
- Product Name
This displays the product’s official title. Tags can help differentiate your products if your company uses unique names.
2. Product Description
This includes an overview of product information such as the materials used, sizing, descriptions, your company’s values, etc. These are typically brief and to the point that customers do not have to spend a lot of time reading them. For example, let’s say you have a furniture store; one of your categories is wardrobes. Therefore, you can have tags such as wooden, metal, boho, vintage, etc.
3. Barcode
Barcodes are critical for tracking products as they move through the retail industry. By introducing a barcode to a product tag, you can easily track how much inventory you have on hand and where it is located in the storage facility.
4. SKU (optional)
Your clients can spot a product by their SKU to track their location if the SKU number is on the tag. Consider adding the SKU to your product tags if your online store has many SKUs.
5. Price (optional)
Your product’s price point on the product tag informs customers about how much the product will cost. If you’re thinking about fulfilling B2Borders, it’s good to have pricing on the tag for in-store use.
Do Product Tags Boost SEO?
This is a pretty common question we see popping up now and then. ‘Product tagging’ is a concept used to organize items on your online store and is not to be confused with product tags used for inventory management. To improve your website’s SEO, you should arrange things in your store using the product tag in the URL. This assists search engines in determining the type of product you’re offering, allowing customers looking for product words to locate it on your website quickly.
What about Product Attributes?
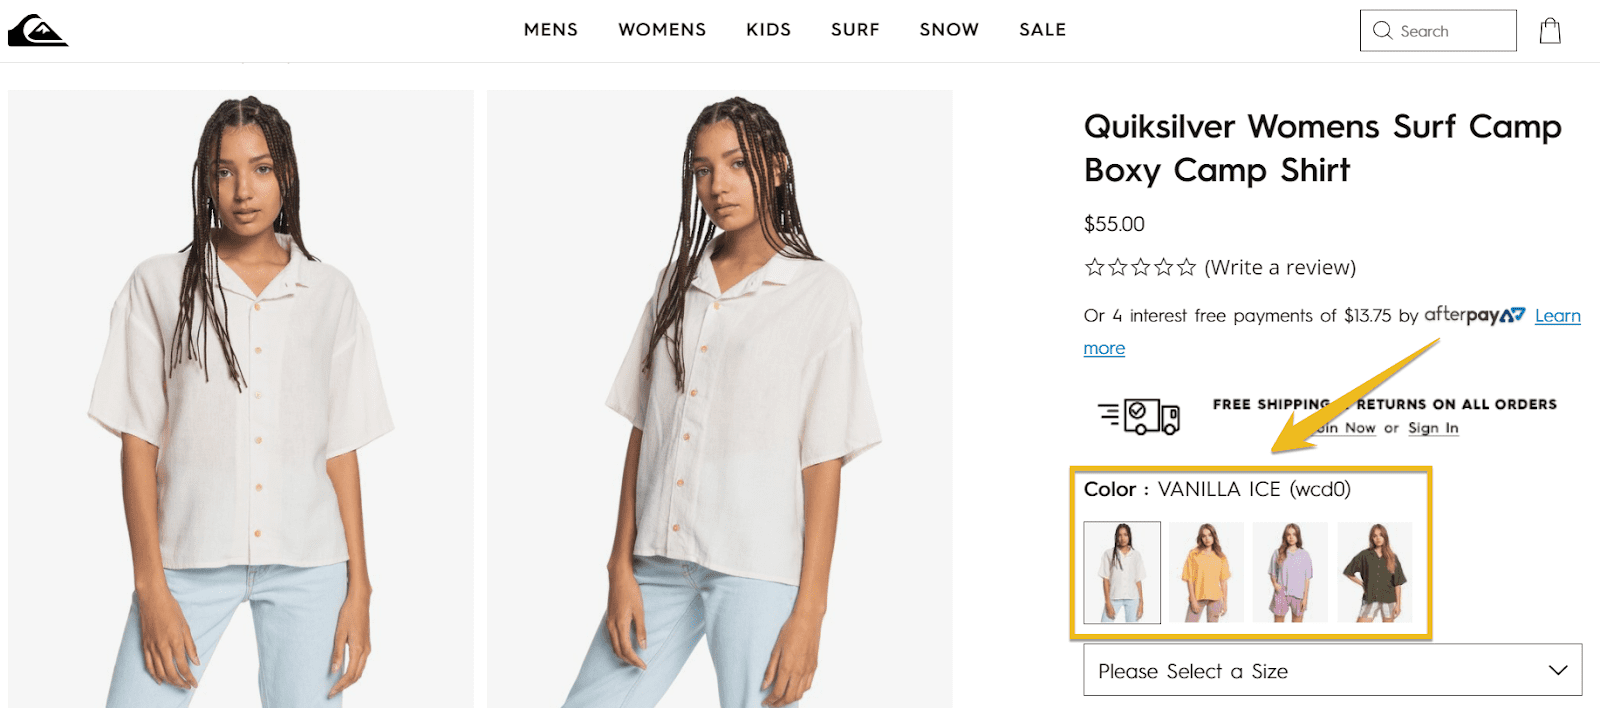
Product attributes identify a product’s features, allowing you to explain them specifically. Options, properties, and extras are all examples of product attributes. Don’t worry; we’ll go in-depth about each of them.
For example, an ‘option’ attribute can be a hoodie’s size or color. On the other hand, ‘Property’ attributes are facts about a commodity that customers cannot alter, such as the brand or content. When looking at sales records, properties come in handy. For example, you could sell a 100% cotton shirt from a well-known brand, and you’d like to compare its sales to those of other shirt materials.
Lastly, ‘extra’ attributes refer to optional configurations that customers can choose from and generally come at an additional cost, such as your unique product customization or gift wrapping. These extras can come in handy when you upsell an item or another commodity.
In a nutshell, WooCommerce product attributes apply to the various characteristics of each item sold in your online store.
Product attributes are usually used in product filters. For example, in fashion, you could filter by size, color, age (for kids stores), material (cotton, leather, etc.), length (midi, maxi, mini), style (boho, vintage, etc.).
So as a simple rule, in order not to get too confused about tags and attributes, keep this in mind: do I need to filter by this characteristic or not? If your answer is a yes, then use details. If not, go for tags.
How to add Product Attributes using WooCommerce
To begin, we must first create a product attribute. So, from your Dashboard, head over to Products → Attributes, and this is what you’ll see:
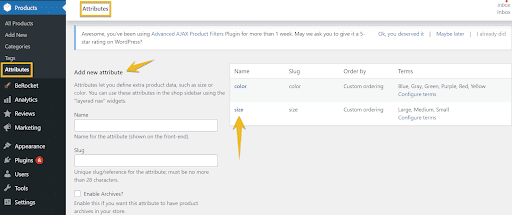
The next obvious step is to add a name and a slug to your product attribute. Of course, you can always edit the name of your product attribute, as a small ‘edit’ button will appear as you click on the term.
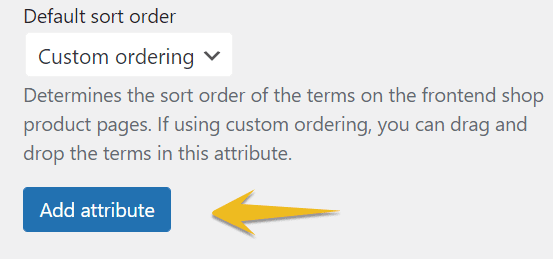
Then click on the ‘Add attribute’ button, and just like that, you have created a new product attribute! Ta-da! 🎉
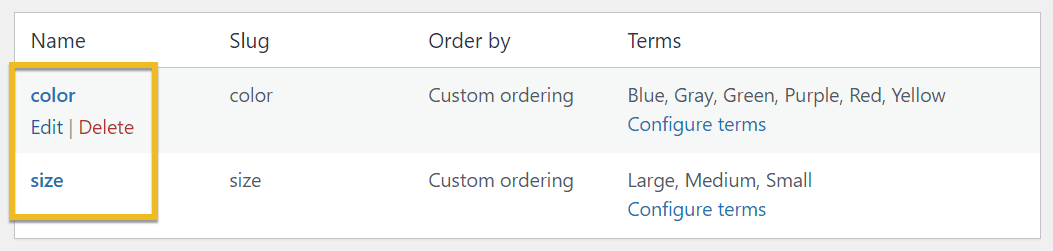
But the show isn’t over just yet. We’ll need to add ‘terms’ to your attribute next. So, if we create a ‘color’ attribute, we’ll need to include it.

See these terms right here? They are apparent color values that must be included in the product attribute.
Make sure you click on ‘Configure terms,’ and the screen will speak for itself. Just like this: 👇
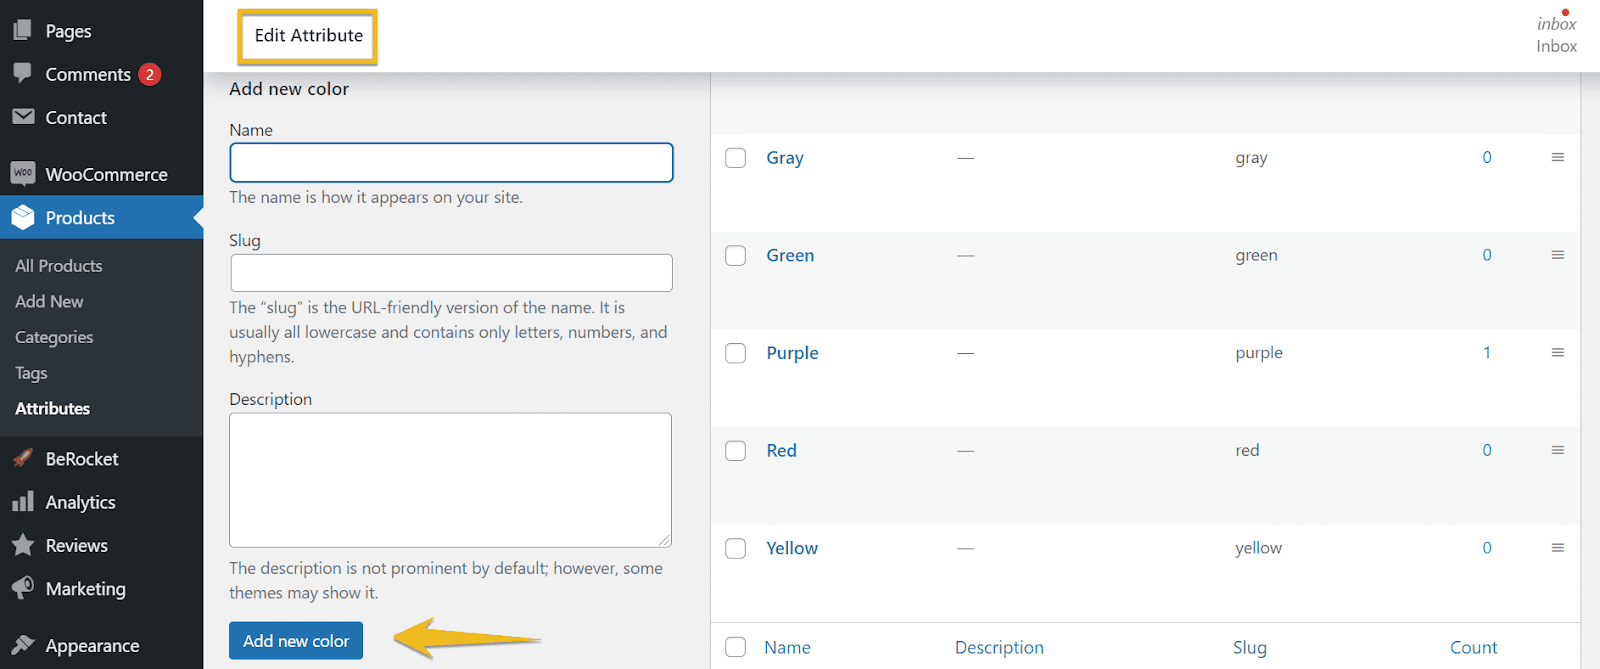
When adding your attribute terms, click ‘Add New Color.’ All that’s left now is to display them on your product page, so let’s see how we can achieve that.
How to display Product Attributes in your online store
To ensure these product attributes are shown on your website, you need to follow the following steps.
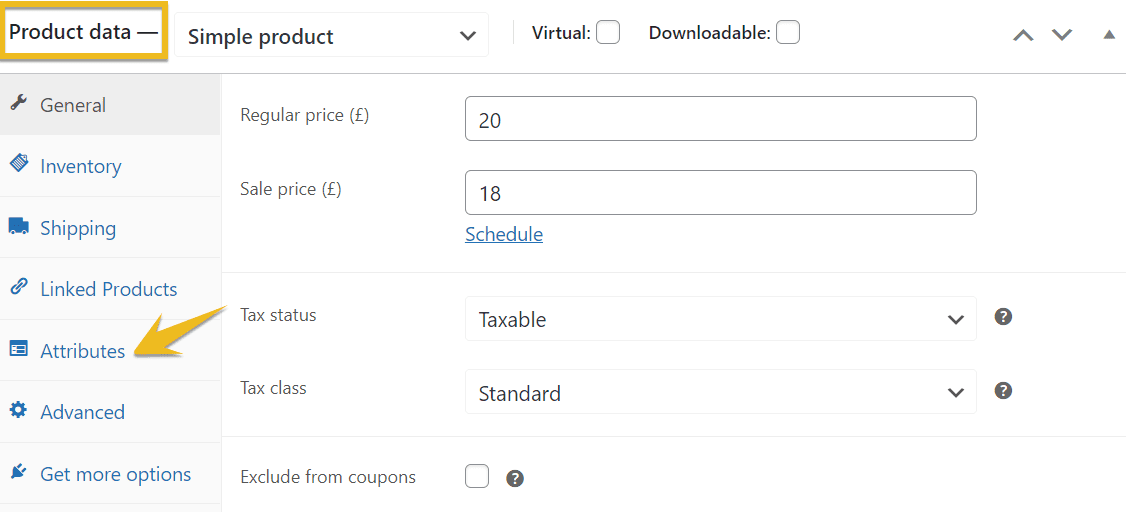
- From your Dashboard, go to Products → All Products
- Select the ‘Attributes’ tab from the ‘Data Product’ section
3. Pick your newly added attribute from the ‘Custom product attribute’ dropdown. Then press the ‘Add’ button.
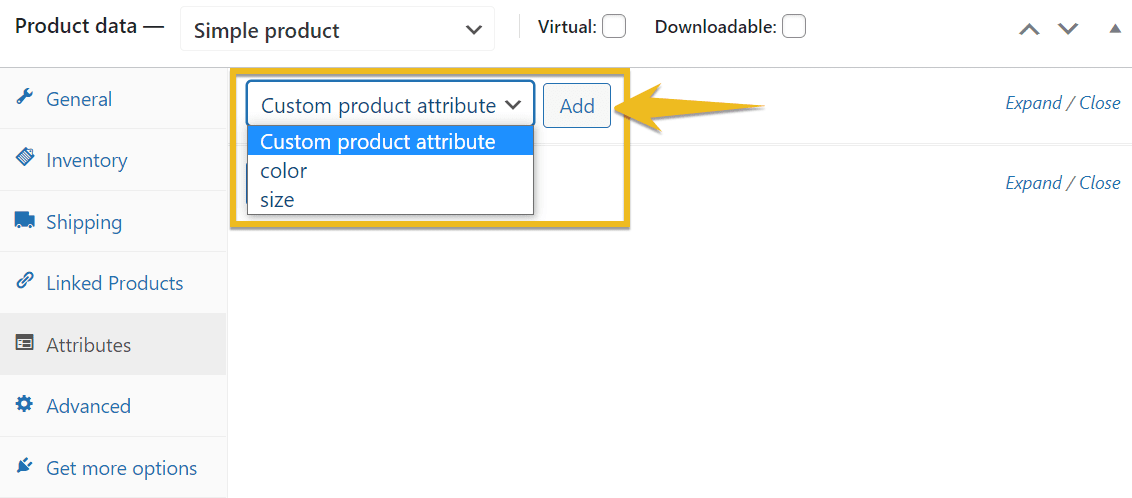
4. Then, by clicking in the Value(s) box and choosing the ones you want to use, you can add the ‘terms’ you generated previously.
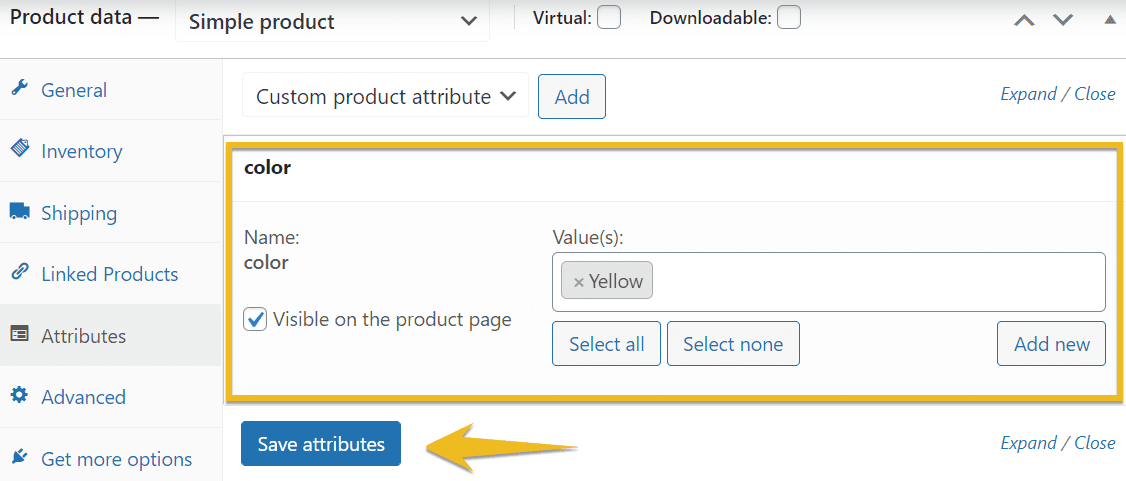
5. When you’re satisfied with the results, click ‘Save attributes’ and then Update or Publish your product.
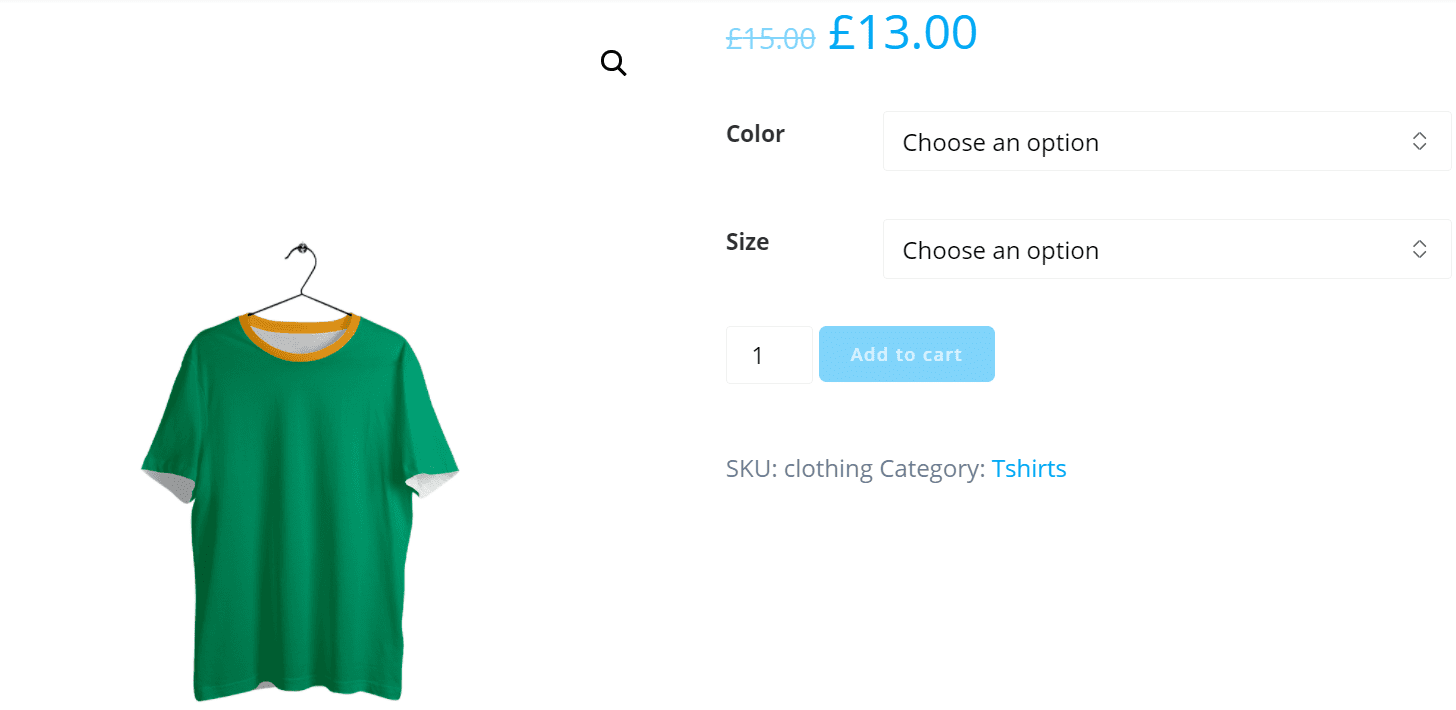
That concludes our discussion. The product attributes you’ve chosen will appear on your product page.

Bottom Line
That’s all! Product attributes, tags, and product categories in your WooCommerce store have been updated and improved. This additional knowledge will provide a more informative and visually appealing shopping experience to your customers, resulting in more sales and happier customers.
Feel free to read our other articles on adding WooCommerce product variables, product reviews, and how to customize your WooCommerce store like a pro! So go ahead and drop us a line in the comments section below.
We’d love to hear from you!

Gabriella is a Digital Content Writer and Marketer with a zeal for all things WordPress. When she’s not researching and drafting the upcoming articles, you can find her in the open air exploring the outdoors with her dog.


Comments are closed